引言
在前一篇文章有提到ceilometer对数据的采集最主要的方式是Bus listener agent,即监听消息总线上ceilometer对notification,所谓notifications,是指openstack各个组件在执行某一个操作的过程中主动发出的一些描述状态或者动作的消息(通常是发送到消息队列)。ceilometer对notifications的处理核心是通过notification代理和ceilometer-collector来完成的。collector会监听消息总线获取openstack其他组件发出的notification消息,(同时也监听ceilometer的pollster发出的消息)
服务
类似于上一篇文章,
plugin
在次之前,简单说一下ceilometer中的Plugin
Ceilometer实现的Plugin框架依赖setuptools的Dynamic Discovery of Services and Plugins实现。这是Ceilometer能进行扩展的基础。Ceilometer中有四种类型的Plugin:Poller,Publisher,Notification和Transformer。
- Poller主要负责被Agent调用去查询数据,返回Counter类型的结果给Agent框架;
- Notification负责在MQ中监听相关topic的消息(虚拟机创建等),并把他转换成Counter类型的结果给Agent框架。
- Transformer负责转换Counter
- Publisher负责将Agent框架中Counter类型的结果转换成消息(包括签名),并将消息发送到MQ;
架构
下面引用一下ceilometer官方开发者文档中的数据采集流程图:
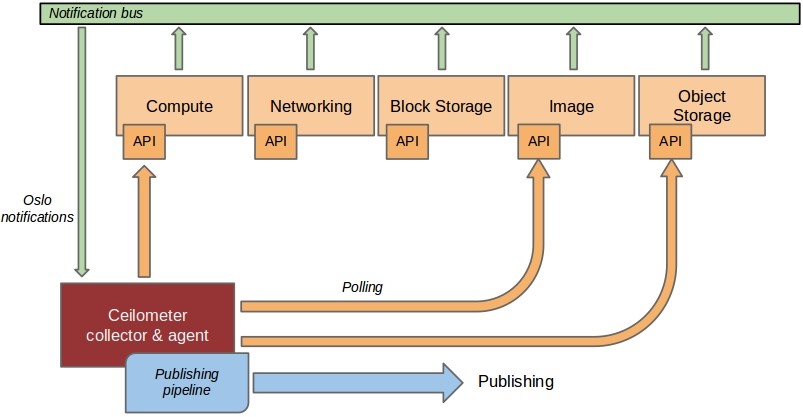
图中绿色的箭头所指向的即为openstack中notifications的消息走向。
代码走读
1.入口
console_scripts =
    ……
    ceilometer-agent-notification = ceilometer.notification:agent
2.服务启动1
2
3
4
5
6def collector():
service.prepare_service()#主要做一些默认配置,配置日志级别等
os_service.launch(NotificationService(
cfg.CONF.host,
'ceilometer.agent.notification')).wait()
#起一个rpc服务,用于创建消息队列的consumer
3.消息队列
服务将会创建3(三种类型:基于topic的,基于host和topic的,基于topic的广播消息)个consumer用于接收消息队列上的消息1
2
3
4
5
6
7
8
9
10
11
12
13
14
15
16
17
18
19
20
21
22
23def initialize_service_hook(self, service):
'''Consumers must be declared before consume_thread start.'''
self.pipeline_manager = pipeline.setup_pipeline(
transformer.TransformerExtensionManager(
'ceilometer.transformer',
),
)
LOG.debug(_('Loading event definitions'))
self.event_converter = event_converter.setup_events(
extension.ExtensionManager(
namespace='ceilometer.event.trait_plugin'))
self.notification_manager = \
extension.ExtensionManager(
namespace=self.NOTIFICATION_NAMESPACE,
invoke_on_load=True,
)
if not list(self.notification_manager):
LOG.warning(_('Failed to load any notification handlers for %s'),
self.NOTIFICATION_NAMESPACE)
self.notification_manager.map(self._setup_subscription)
这个关键的函数里面,分为3步:
第一步,用于安装pipline,也就是加载transformer,这里会加载pipline的配置文件(/etc/ceilometer/pipline.yaml)最终得到Pipline对象,Pipline对象是这个样子的:
1 | { |
从这个接口里可以看出pipline中定义了周期(默认600s),最主要的是transformer,主要完成对数据的转换,然后是pubishers列表,这里可以看出ceilometer支持多发布机制。
第二步,用于加载事件转换driver,这里首先会从配置文件(event_definitions.yaml)里面来加载event的定义,若没有该配置文件则使用默配置(空列表);其次将ExtensionManager对象中的事件定义添加到事件定义列表中,这里的ExtensionManager对象会加载setup.cfg中定义的:
ceilometer.event.trait_plugin =
#用于默认一个字符串分割(默认用".")的插件
split = ceilometer.event.trait_plugins:SplitterTraitPlugin
#用于位字段分割的插件
bitfield = ceilometer.event.trait_plugins:BitfieldTraitPlugin
第三步,首先获取notification的driver列表,这里使用extension.ExtensionManager,是根据setup.cfg中定义的以该类namespace(ceilometer.notification)字段的列表,即下面这些:
instance = ceilometer.compute.notifications.instance:Instance
……
#具体不一一列出,有兴趣可以看看代码里面setup.cfg
http.response = ceilometer.middleware:HTTPResponse
这个列表定义了notification目前所能处理的内容,同时在extension.ExtensionManager的对象初始化参数中我们还注意到有一个invoke_on_load=True表明在加载上述列表的插件的时候会调用该插件对象。
最后,还有关键的一步,notification_manager.map(self._setup_subscription),这一步是对上面加载完成的插件列表每一个对象调用self._setup_subscription这个方法,也就是对每一个notification建立订阅关系,在_setup_subscription有以下关键的实现:
1 | for exchange_topic in handler.get_exchange_topics(cfg.CONF): |
在这个实现对该notification插件建立notification消息的处理,这里关键在于:
callback=self.process_notification
到这个方法会对每一个获取到的notification进行处理并将其发布出去。